Automating Infrastructure Deployment: Terraform, Azure & GitHub

Automating infrastructure deployment is essential for efficiency and consistency in the fast-paced world of cloud computing. Terraform, an infrastructure as code (IaC) tool, allows you to define and provision infrastructure using a declarative configuration language. Cloud-native DevOps solutions like Azure DevOps are proficient in handling large application infrastructures. However, the constraint of the free tier to just 5 users poses a hurdle for smaller companies. An alternative approach is to establish a Terraform state in an Azure blob with a state lock mechanism. This offers accessibility to any number of developers.
In this blog post, we’ll walk through the step-by-step process of setting up Terraform with an Azure Remote State backend. Secondly, we’ll look into executing the infrastructure code through GitHub Actions. You can find the code for this setup here: https://github.com/WithACX/azure-experiments/tree/main/tfe-with-blob-backend.
Step 1: Install Terraform Locally
Please install Terraform on your local machine before starting to automate infrastructure deployment. You can download the latest version from the official Terraform website: Terraform Downloads.
Step 2: Create an Azure Storage Account for Remote State
Next, you need to create some resources in your Azure account before you can store your state in a locked and encrypted blob file. In a nutshell, you need three setups before you can begin:
- Create an Azure subscription: A subscription is a fundamental unit of billing and access control for Azure resources. When you sign up for Azure, you create an Azure subscription that serves as a billing container for Azure services. You can go to Subscription → Add → Name the subscription (name will be used in later steps) → Done.
- Create a Resource Group: In Microsoft Azure, a resource group is a logical container used to organize and manage related Azure resources. It acts as a way to group and manage resources based on factors such as their lifecycle, application, or environment. You can go to Resource Groups → Create → Name the resource group (name will be used in later steps) → Done.
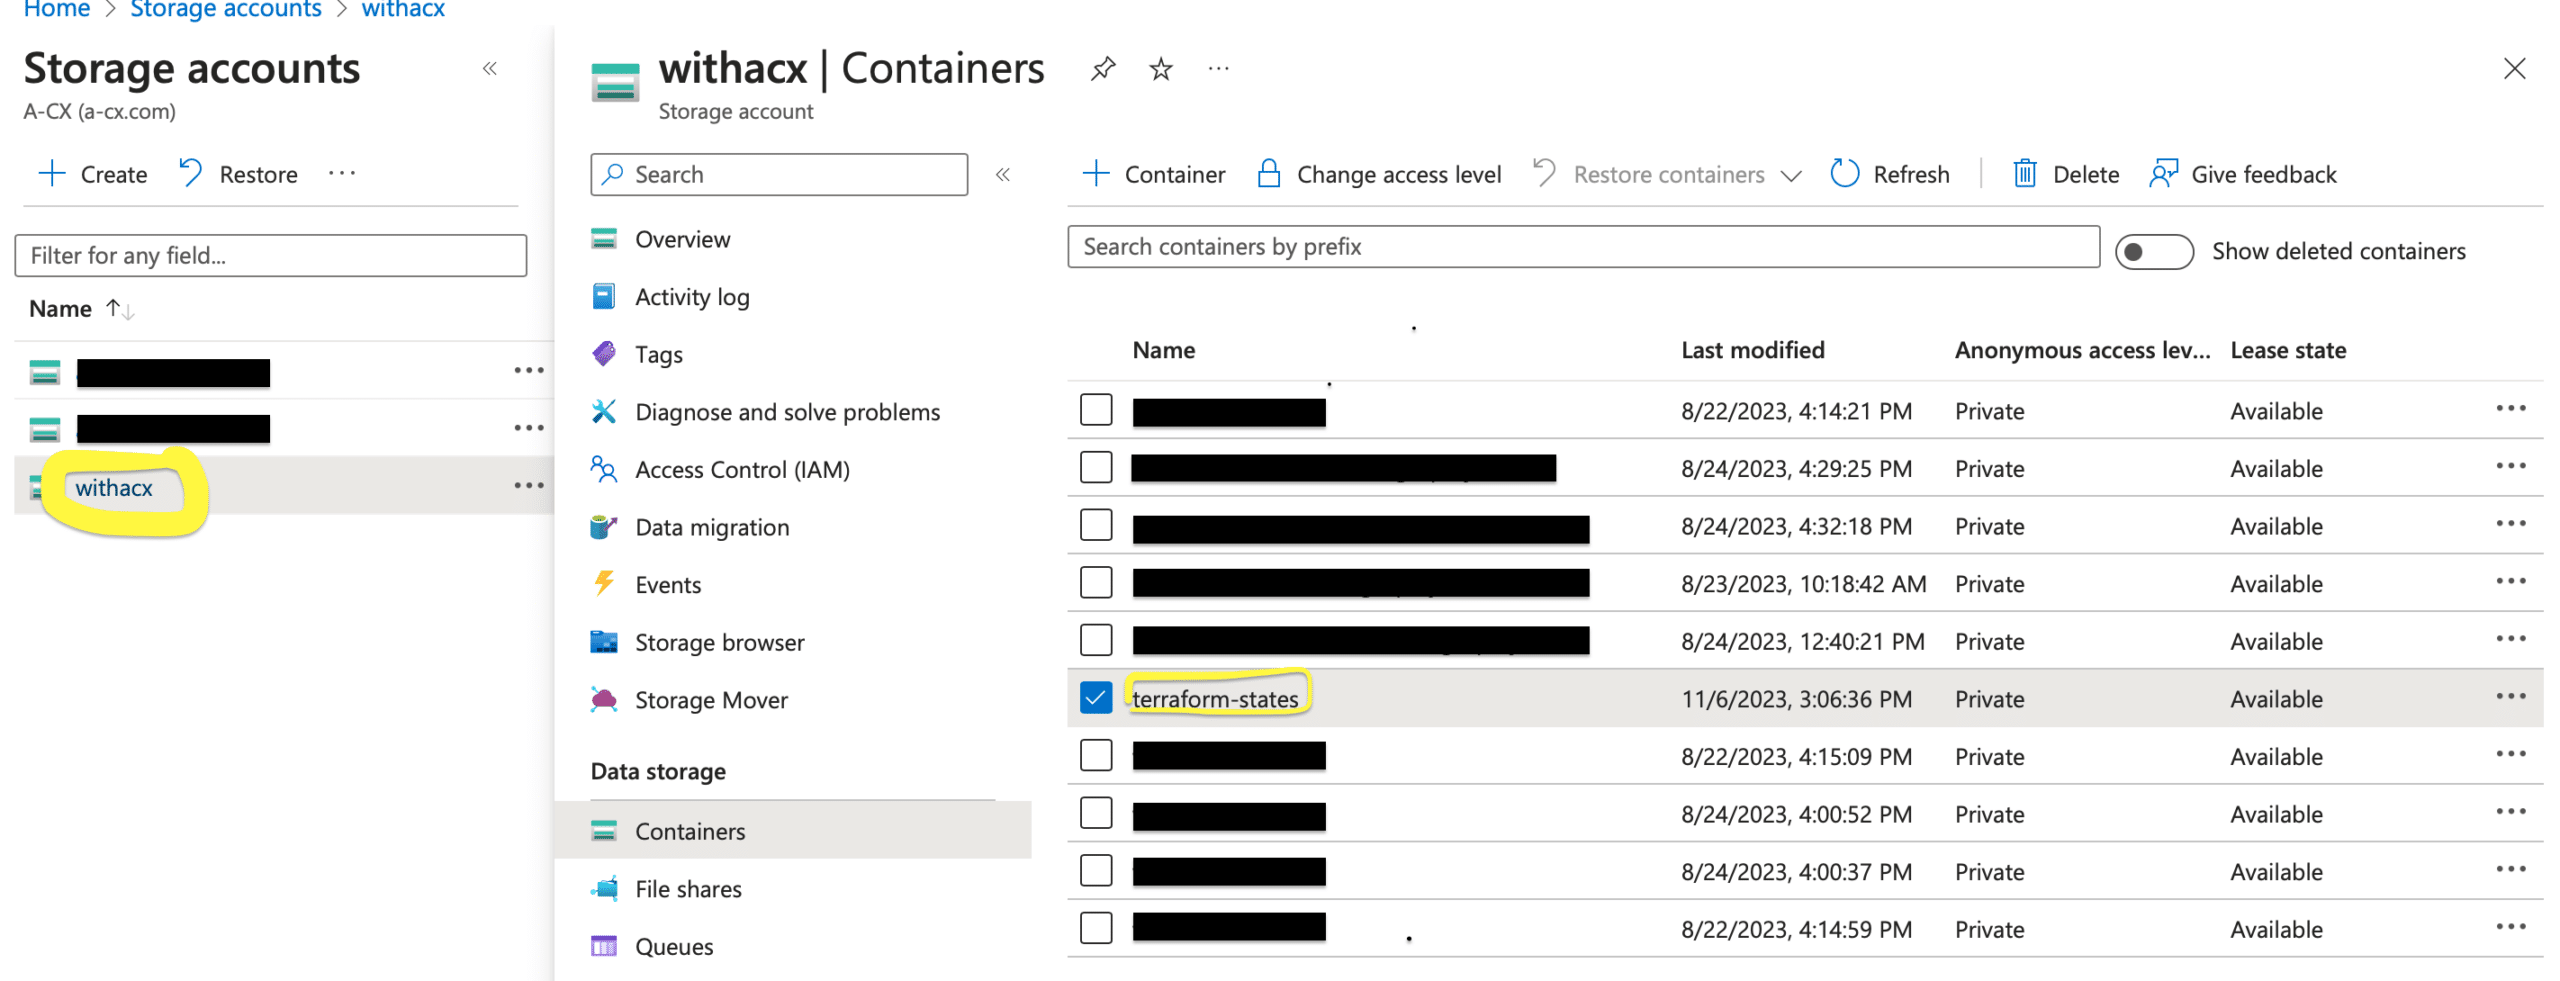
- Azure Storage Account: You need to set up a store for the Terraform Remote State. This state file will contain the latest state of the application’s infrastructure and will be used by Terraform to plan and apply changes. Go to Storage accounts → Create → Chose the subscription and resource group created above → Name the storage account (name will be used in later steps)→ Let rest of the values fallback to default → Done. After the final step, you should be able to find your storage account associated with the correct resource group and subscription, just like the image below.
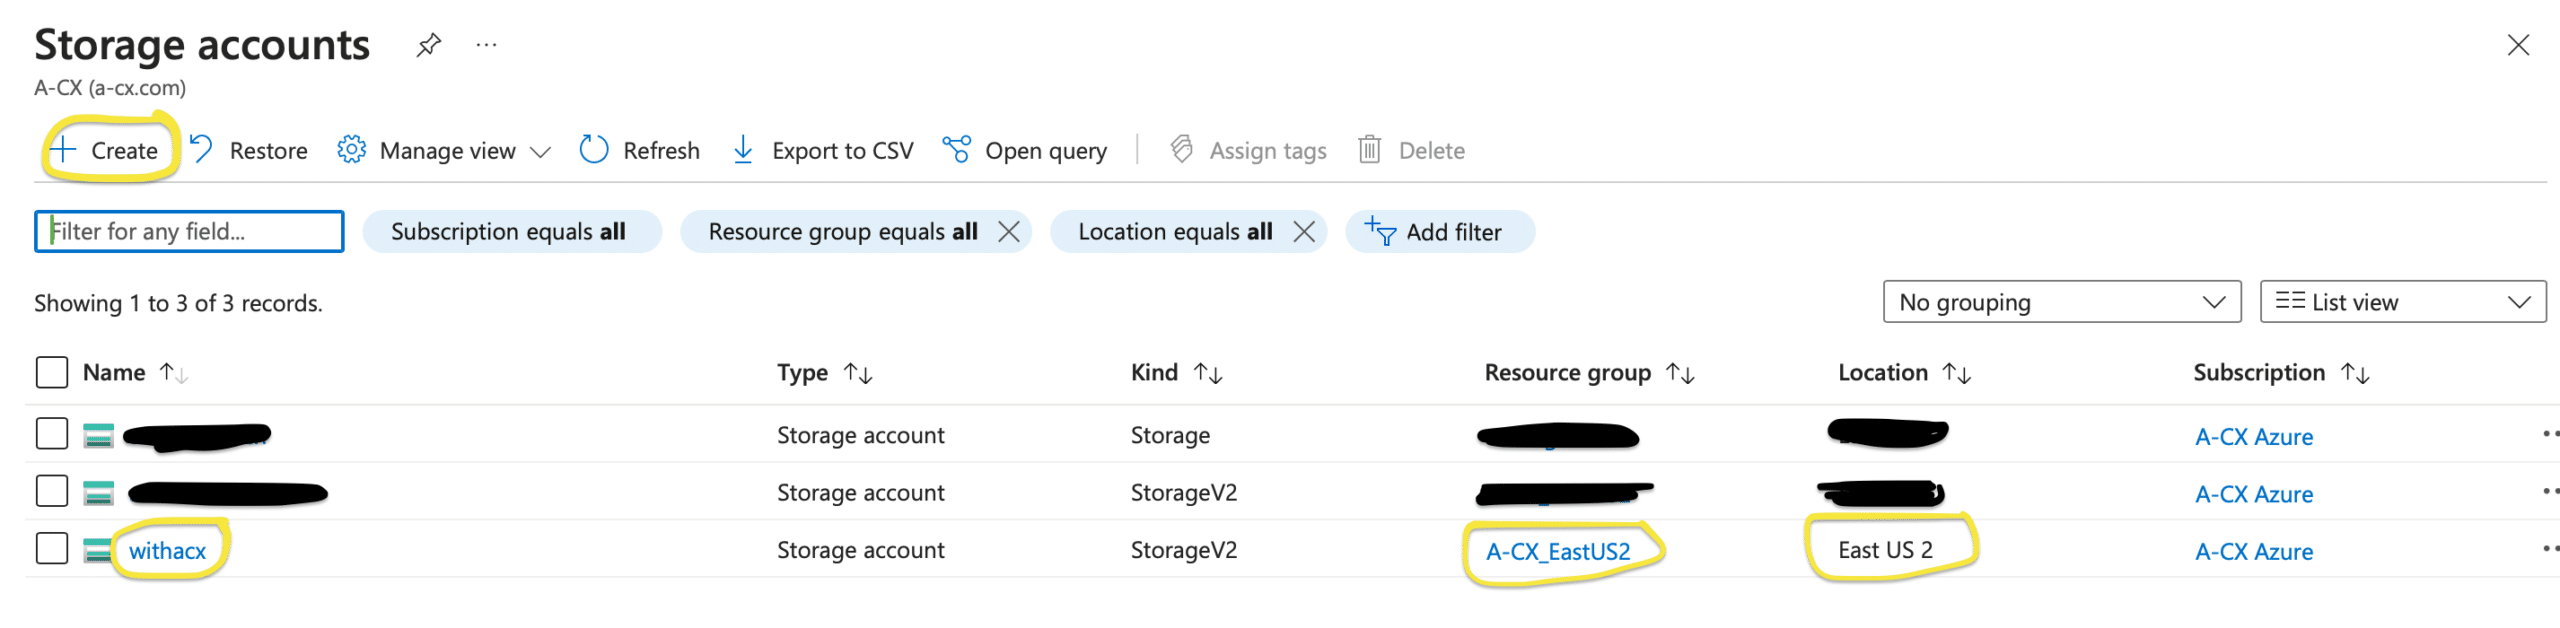
- Azure Storage container: The term “containers” in the context of a storage account typically refers to Azure Blob Storage containers. Azure Blob Storage is a cloud-based object storage solution. It’s designed to store and manage massive amounts of unstructured data. A terraform state file perfectly fits this description. Go to Storage account created in the previous step Containers → Name the container (name will be used in later steps)→ Create.
Step 3: Configure Terraform Backend
Now you’re halfway through automating infrastructure deployment, create a terraform file ‘main.tf’ in your repo’s root folder. Modify your ‘main.tf’ file with the following backend configuration:
terraform {

  required_providers {
      azurerm = {
        source  = "hashicorp/azurerm"
        version = "~>3.0"
      }
  }

  backend "azurerm" {
    resource_group_name   = "A-CX_EastUS2"      # name given in the previous step
    storage_account_name = "withacx"           # name given in the previous step
    container_name       = "terraform-states"  # name given in the previous step
    key                  = "terraform.tfstate" # name you want the state file to have
  }
}

provider "azurerm" {
  features {}
}
This configuration tells Terraform to use Azure Storage as the backend for storing the state.
Step 4: Set up Github Secrets to be fetched by Github Actions to log in to your Azure Storage
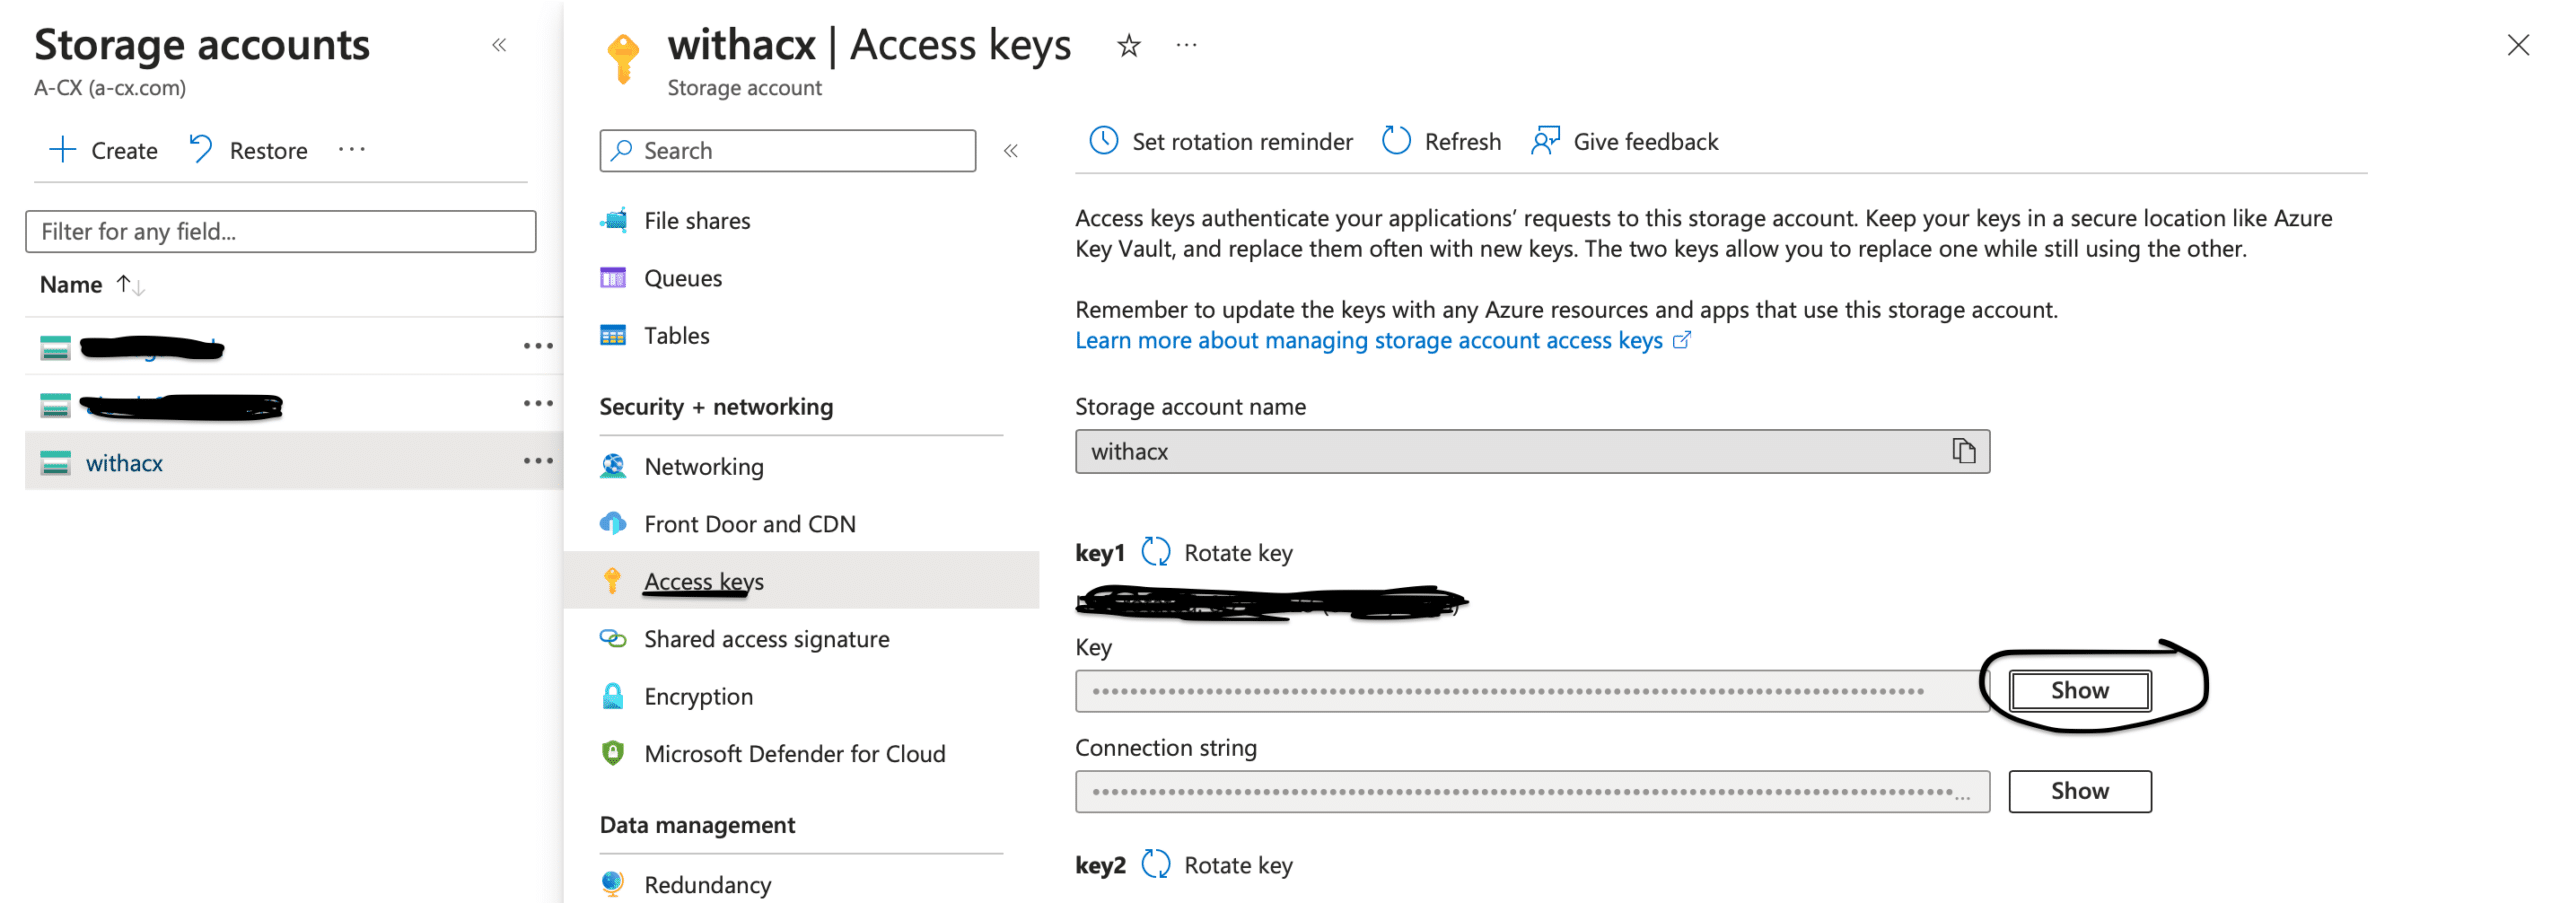
We could hardcode the access key directly to the pipeline, but this is dangerous since anyone with access to the repository will have access to the key. A better approach is to secure it by storing it as a GitHub secret. By default, a storage account has a single access key, and this key gives access to all the storage containers inside it; for this blog, we will stick to this single access key. For more fine-tuning of keys, you can create a separate access key to your storage container holding the state file. To fetch the access key for the storage account, follow the below steps:
- Click on the storage account you created above.
- On the sidebar under Security + networking subsection, click on Access keys.
- Copy the First key from the list of keys.
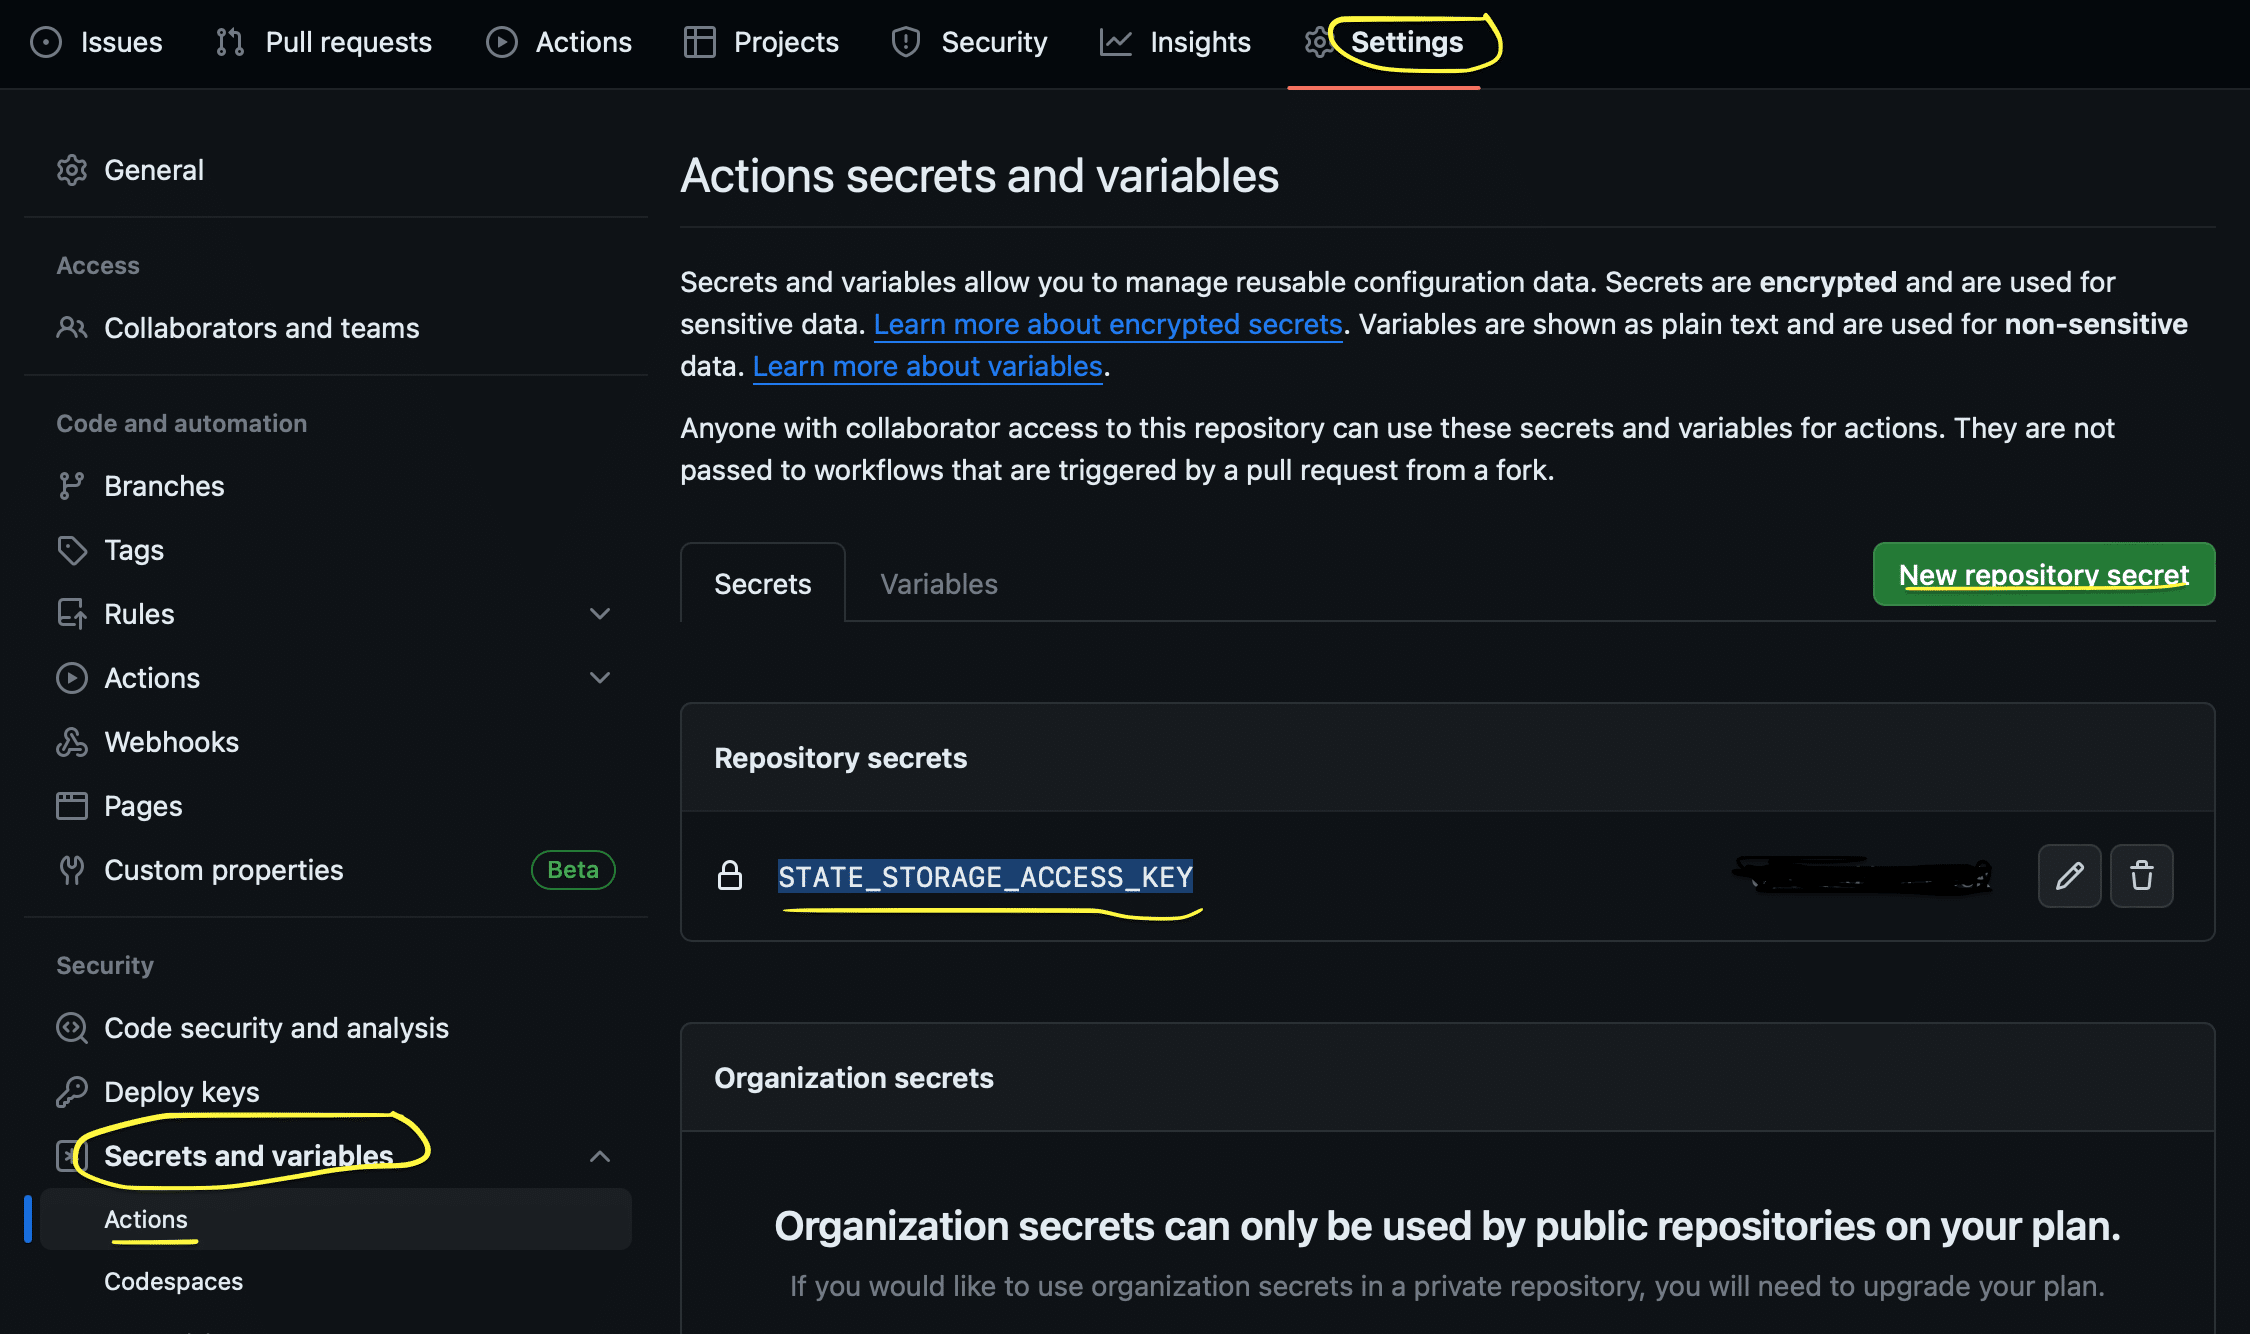
Now, once you have the key, go to your GitHub repo → Settings → Secrets and Variables → Actions → New Repository Secret
Add a secret with the name: STATE_STORAGE_ACCESS_KEY
Note of Caution: If the access keys are rotated on the portal, this key must be updated in the GitHub secrets.
Step 5: Set up the GitHub Actions pipeline
This is the final step in automating infrastructure deployment. Create a .github/workflows/main.yml file in your GitHub repository to define the GitHub Actions workflow. Below is a simple example; please make sure the secret variable name is the one created in the previous step, i.e., STATE_STORAGE_ACCESS_KEY:
name: 'Terraform'

# Conditional on when to run this job.
on:
  push:
    branches: [ "main" ]
  pull_request:

# Permissions given to gitlab runner over the contents of this repo
permissions:
  contents: read

jobs:
  terraform:
    name: 'Terraform'
    runs-on: ubuntu-latest
    environment: production
defaults:
  run:
    shell: bash

steps:
# Checkout the repository to the GitHub Actions runner
- name: Checkout
  uses: actions/checkout@v3


# Initialize a new or existing Terraform working directory by creating initial files, loading any remote state, downloading modules, etc.
- name: Terraform Init
  env:
    ARM_ACCESS_KEY: ${{ secrets.STATE_STORAGE_ACCESS_KEY }}
  run: terraform init

- name: Terraform Plan
env:
  ARM_ACCESS_KEY: ${{ secrets.STATE_STORAGE_ACCESS_KEY }}
run: terraform plan

# On push to "main", build or change infrastructure according to Terraform configuration files
# Note: It is recommended to set up a required "strict" status check in your repository for "Terraform Cloud". See the documentation on "strict" required status checks for more information: https://help.github.com/en/github/administering-a-repository/types-of-required-status-checks
- name: Terraform Apply
env:
  ARM_ACCESS_KEY: ${{ secrets.STATE_STORAGE_ACCESS_KEY }}
run: terraform apply -auto-approve -input=false
This GitHub Actions workflow defines a job that runs on every push to the main branch. It checks out the code, sets up Terraform, initializes the configuration, plans the changes, and applies them automatically.
Step 6: Make a commit to the GitHub repo and push the state file to Azure
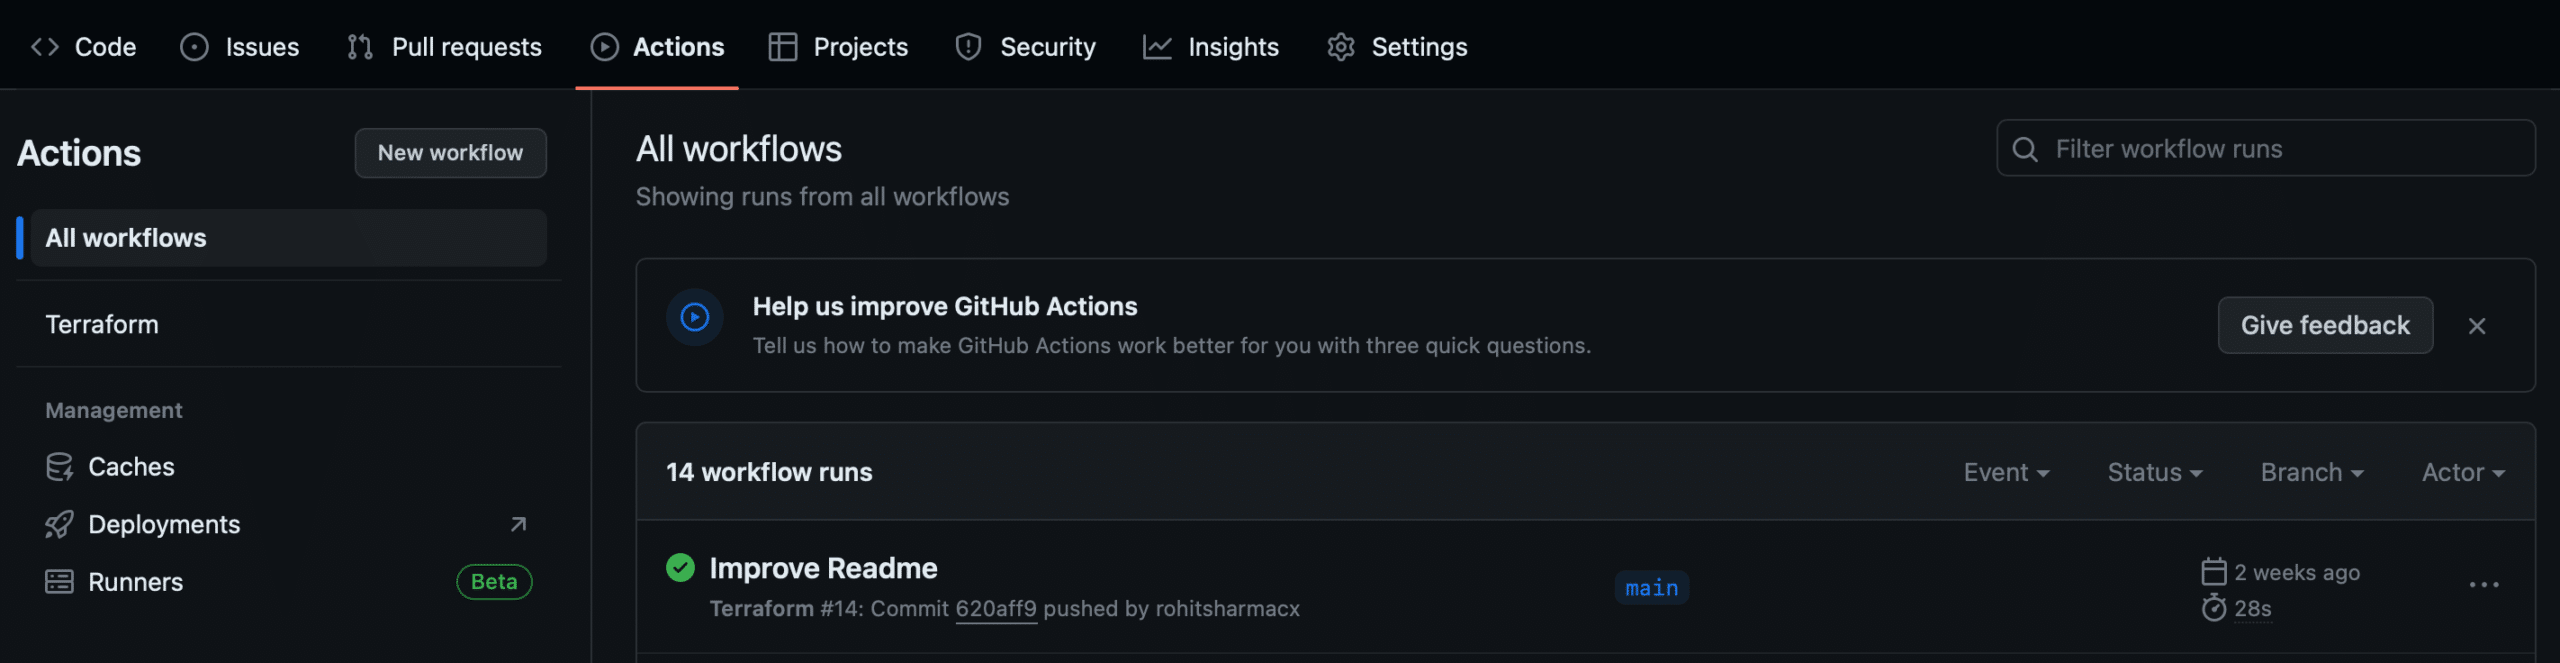
If you want to check the success of your automated code process on GitHub, go to your project’s repository and click on “Actions.” There, you can find a record of successful runs of your code pipeline. This will provide you with more insights into the specific tasks performed during the latest run. Please click on the most recent workflow run, and it will provide a breakdown of the individual jobs associated with your pipeline.
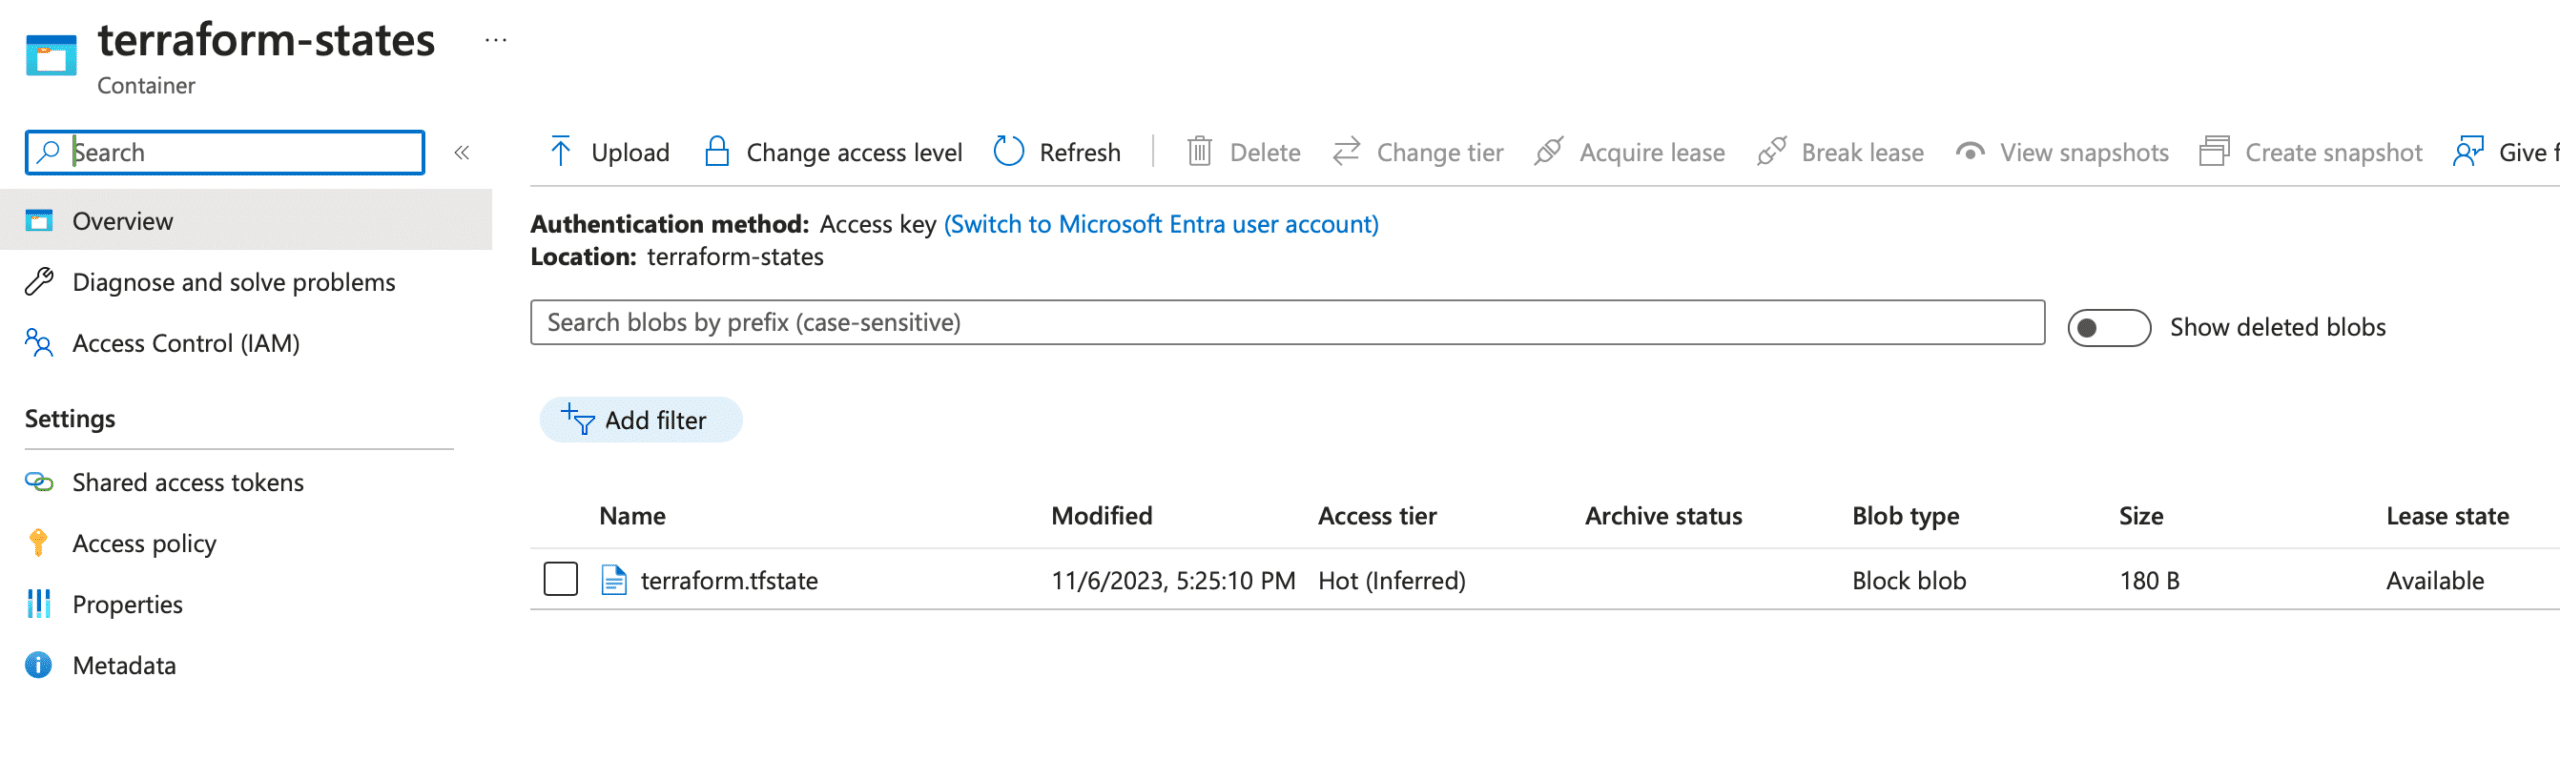
Next, please make sure your code pipeline successfully uploaded the Terraform state file to the storage container you created. Please head to the portal and search for the container named “terraform-states,” as specified in the previous step. If you find it, your pipeline has effectively stored the Terraform state in the designated location.
After accessing the container, check for a file named “terraform.tfstate,” as defined in the previous step. If you spot this file, it serves as confirmation that you’ve successfully and comprehensively set up everything according to the defined specifications.
By following these steps, you’ve successfully set up Terraform with an Azure Remote State backend. Secondly, you’ve integrated it with GitHub Actions, automating infrastructure deployment. This enables you to maintain version-controlled, reproducible infrastructure as code, improving collaboration and reducing manual errors in the deployment process.
Conclusion
Unlike S3, Azure Storage Account has a default locking mechanism. This ensures that multiple applies won’t happen simultaneously. Confirm this by navigating to the storage account in the Azure portal, then to data storage, and open containers. You don’t need to take additional steps to maintain state locks.
Terraform state file will track any resource created in this repo. Note that as we created the initial necessary resources manually, they won’t be tracked. By keeping these resources untracked, we isolate them from the development environment, keeping them safe from accidental modification or deletion, which could lead to the terraform state becoming corrupted or lost.
By following these detailed steps and incorporating the provided Terraform module, you’ve successfully set up a streamlined process for deploying infrastructure using Terraform, an Azure backend, and GitHub Actions. This comprehensive setup enhances collaboration, reduces errors, and empowers you to manage your infrastructure with confidence and efficiency.